> ## Documentation Index
> Fetch the complete documentation index at: https://vibekanban.com/docs/llms.txt
> Use this file to discover all available pages before exploring further.
# Issues
> Create, edit, and manage issues to track your work
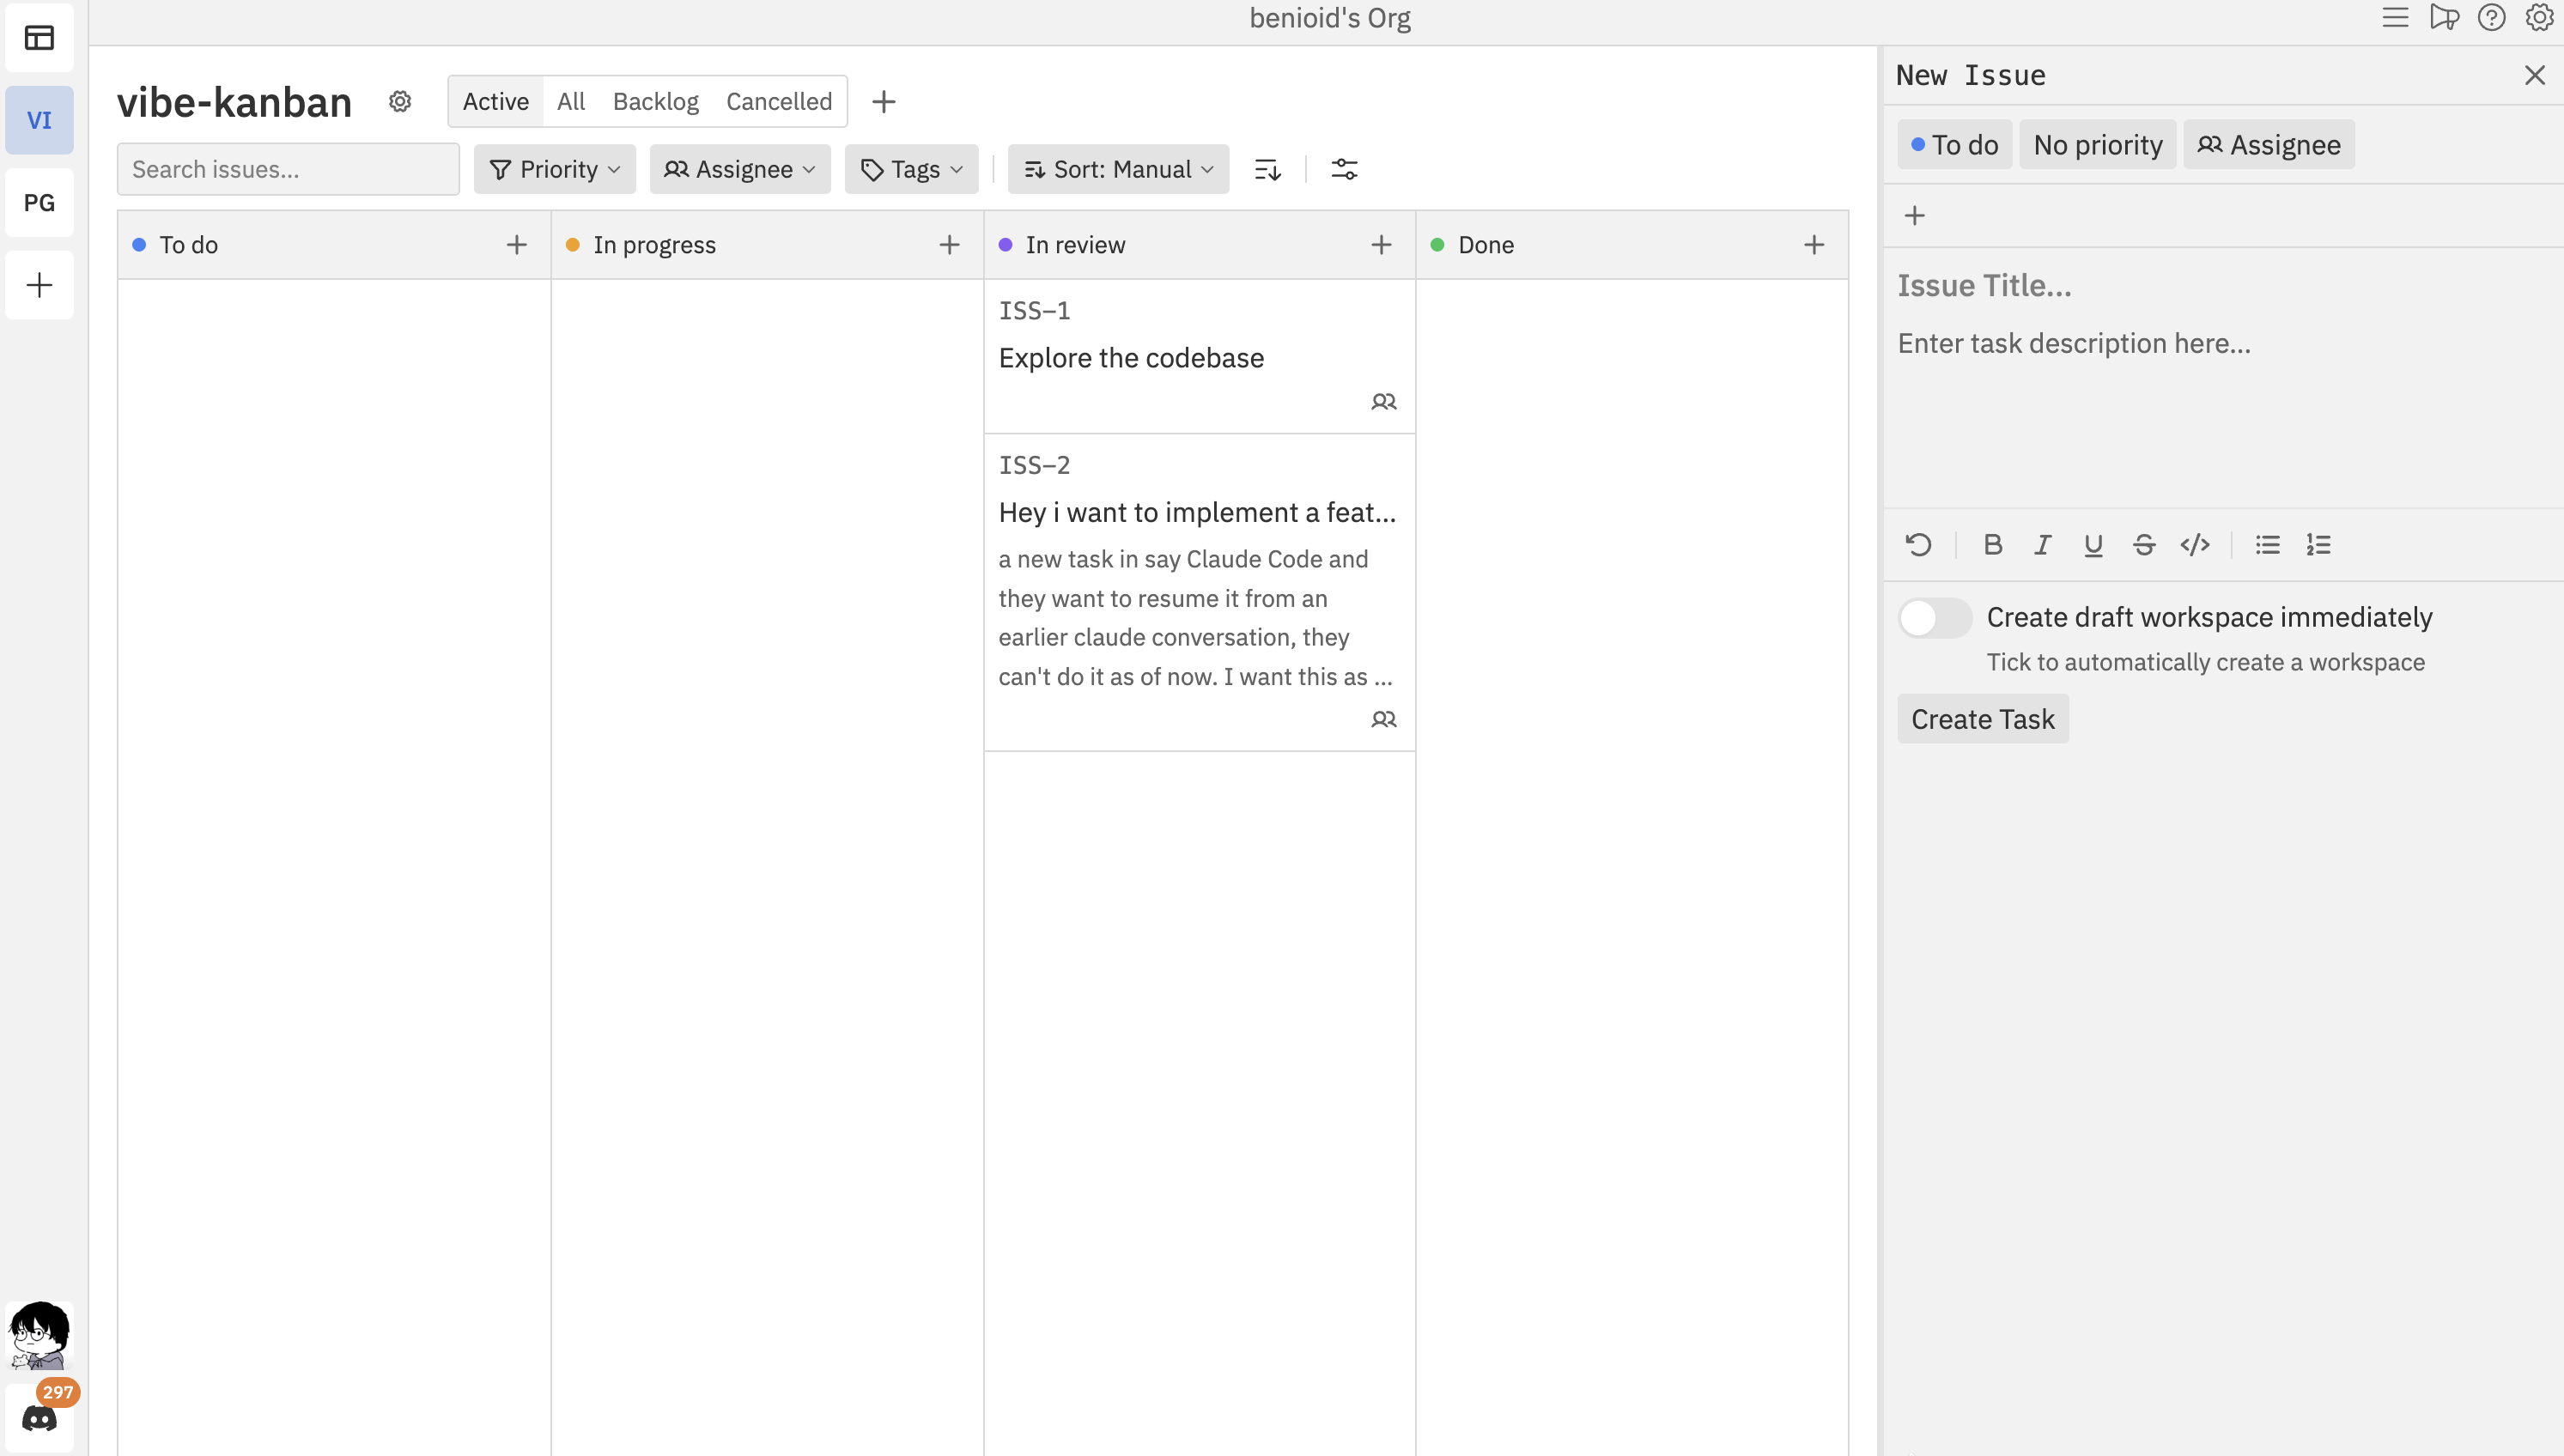
Issues are the individual work items in your project - bugs to fix, features to build, tasks to complete. Each issue lives on your kanban board and can be assigned to team members, tagged, prioritised, and tracked through your workflow.
 ## What is an Issue?
An **issue** represents a single piece of work. It has:
* **Title** - A short description of what needs to be done
* **Description** - Detailed information, requirements, or context
* **Status** - Which column it's in (To Do, In Progress, Done, etc.)
* **Priority** - How urgent it is (Urgent, High, Medium, Low)
* **Assignees** - Who's responsible for the work
* **Tags** - Labels for categorisation and filtering
* **Simple ID** - A unique identifier like `TASK-123` for easy reference
## Creating Issues
### From a Column
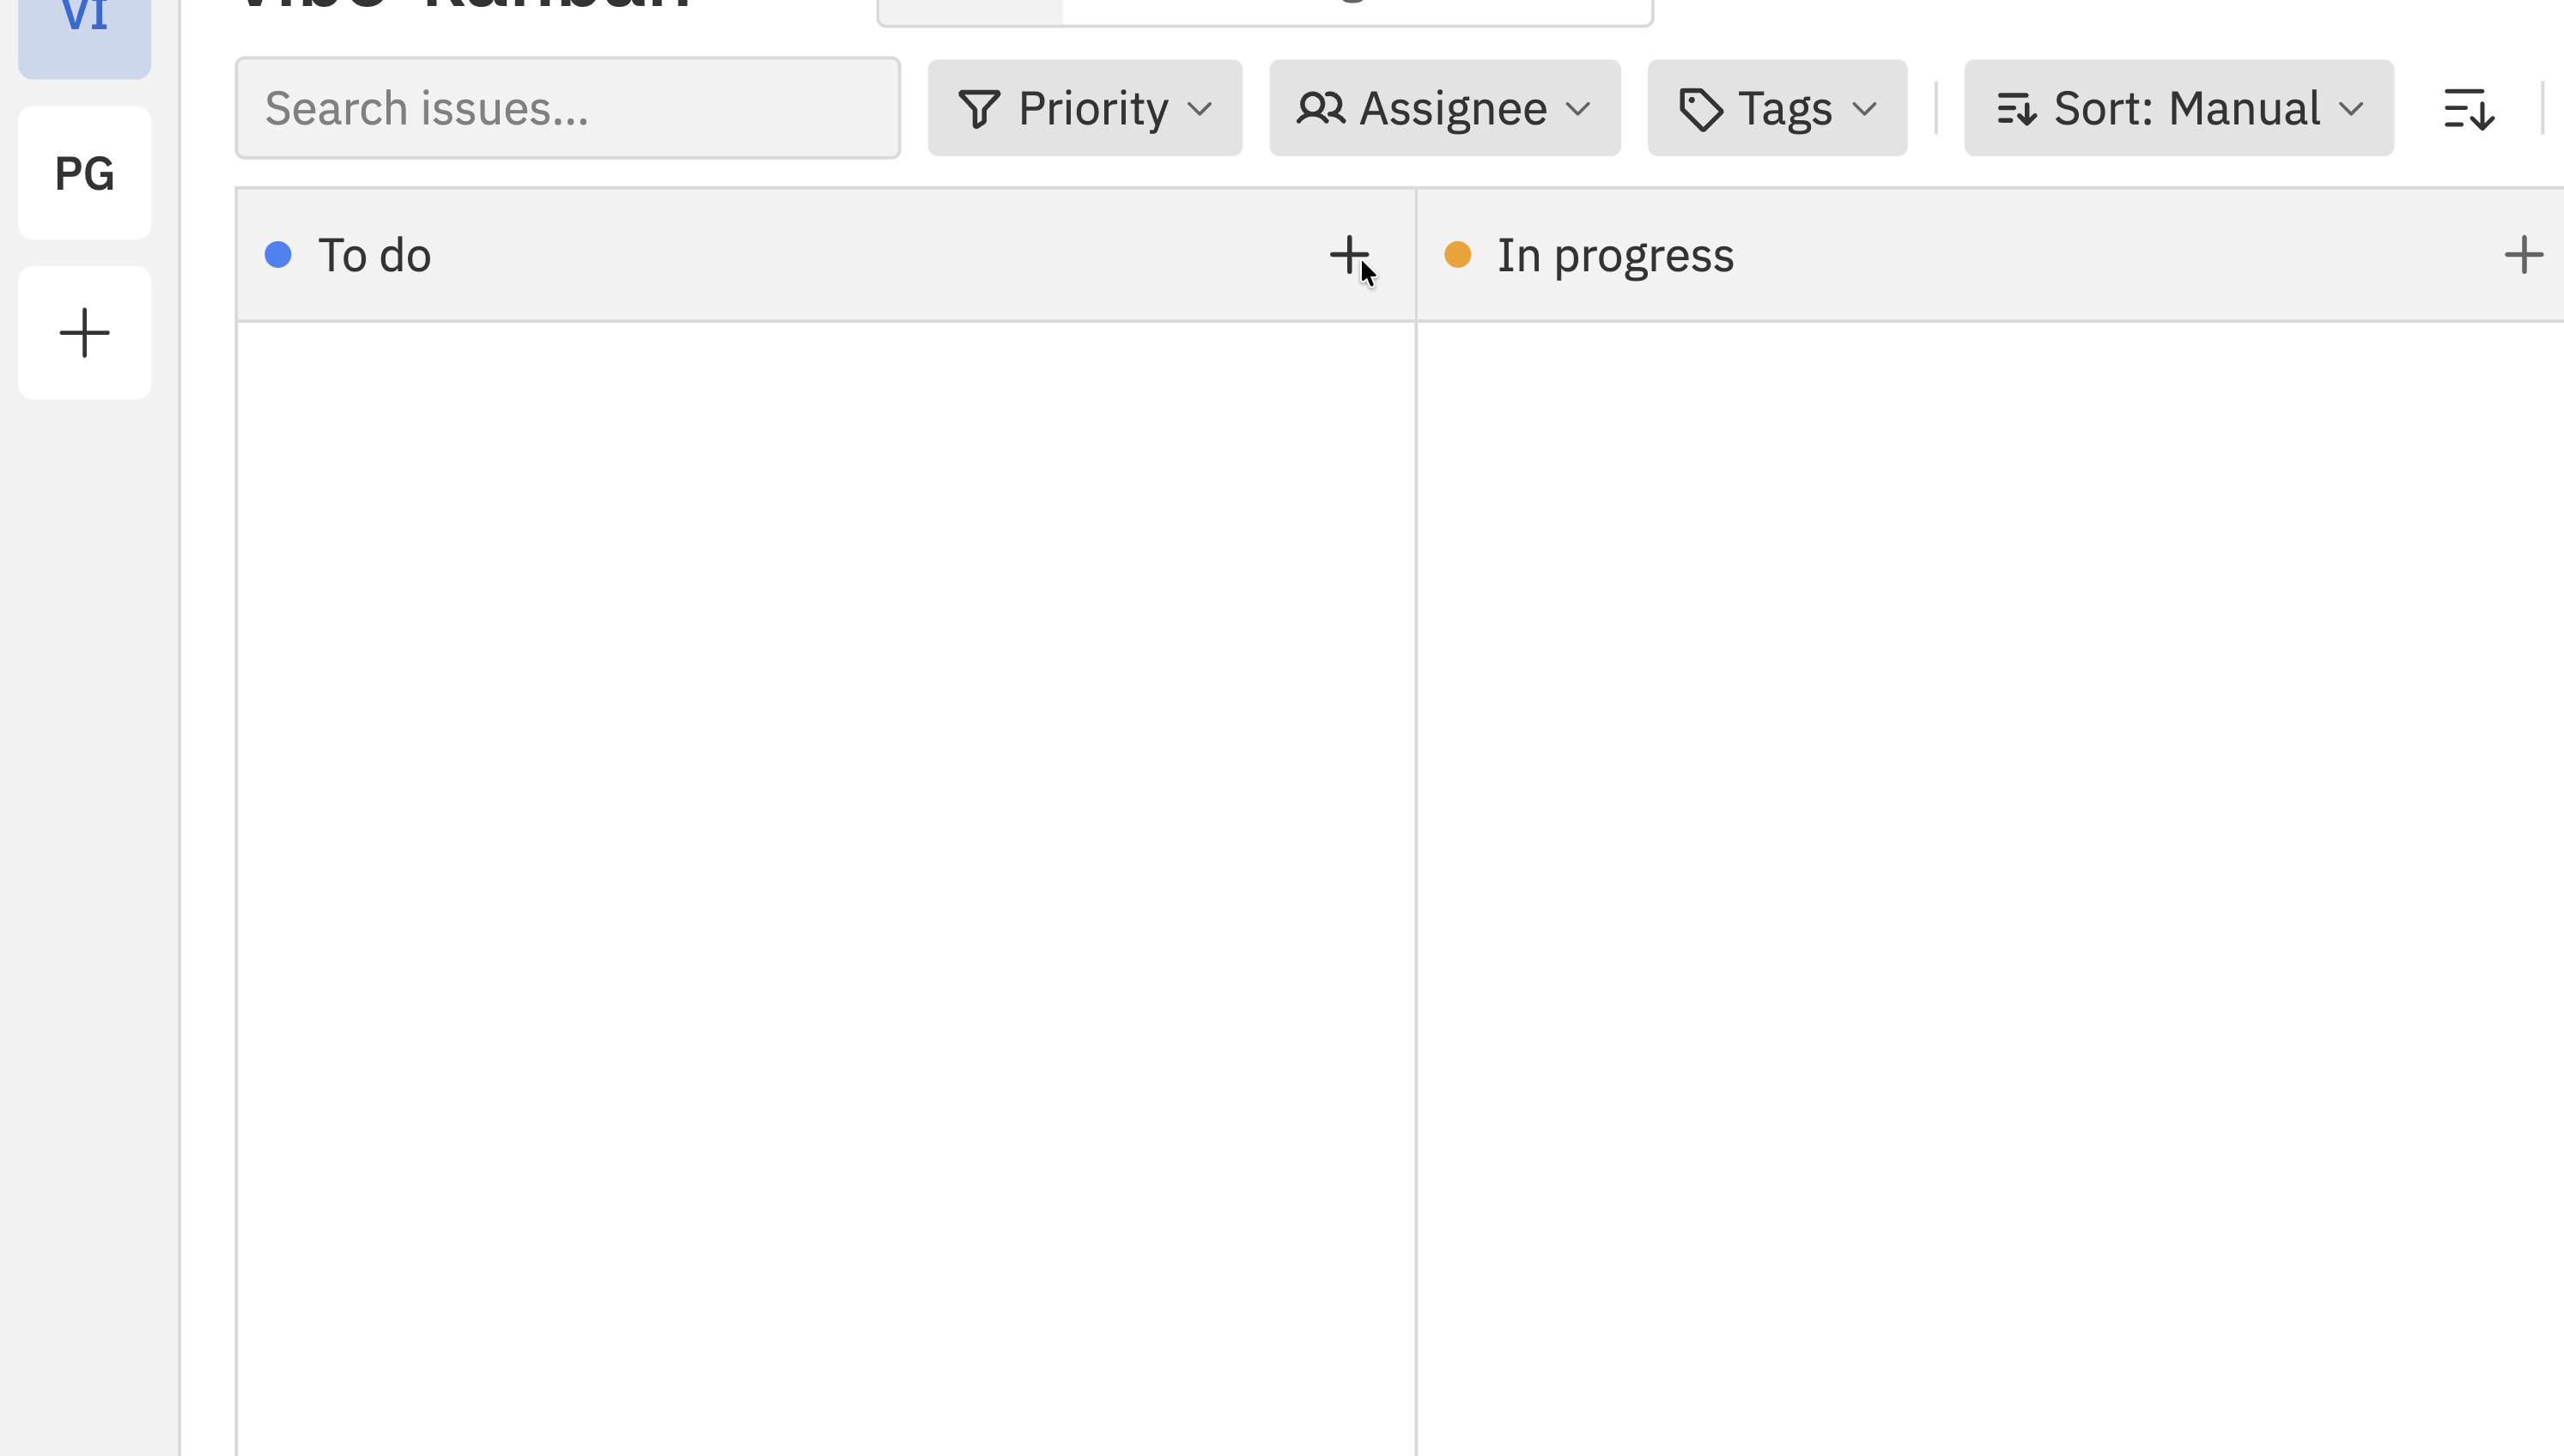
To create an issue in a specific column:
1. Click the **+** button at the top of any status column
2. The New Issue panel opens with that status pre-selected
3. Fill in the issue details and click **Create Task**
## What is an Issue?
An **issue** represents a single piece of work. It has:
* **Title** - A short description of what needs to be done
* **Description** - Detailed information, requirements, or context
* **Status** - Which column it's in (To Do, In Progress, Done, etc.)
* **Priority** - How urgent it is (Urgent, High, Medium, Low)
* **Assignees** - Who's responsible for the work
* **Tags** - Labels for categorisation and filtering
* **Simple ID** - A unique identifier like `TASK-123` for easy reference
## Creating Issues
### From a Column
To create an issue in a specific column:
1. Click the **+** button at the top of any status column
2. The New Issue panel opens with that status pre-selected
3. Fill in the issue details and click **Create Task**
 ### From the Header
To create an issue using the header button:
### From the Header
To create an issue using the header button:
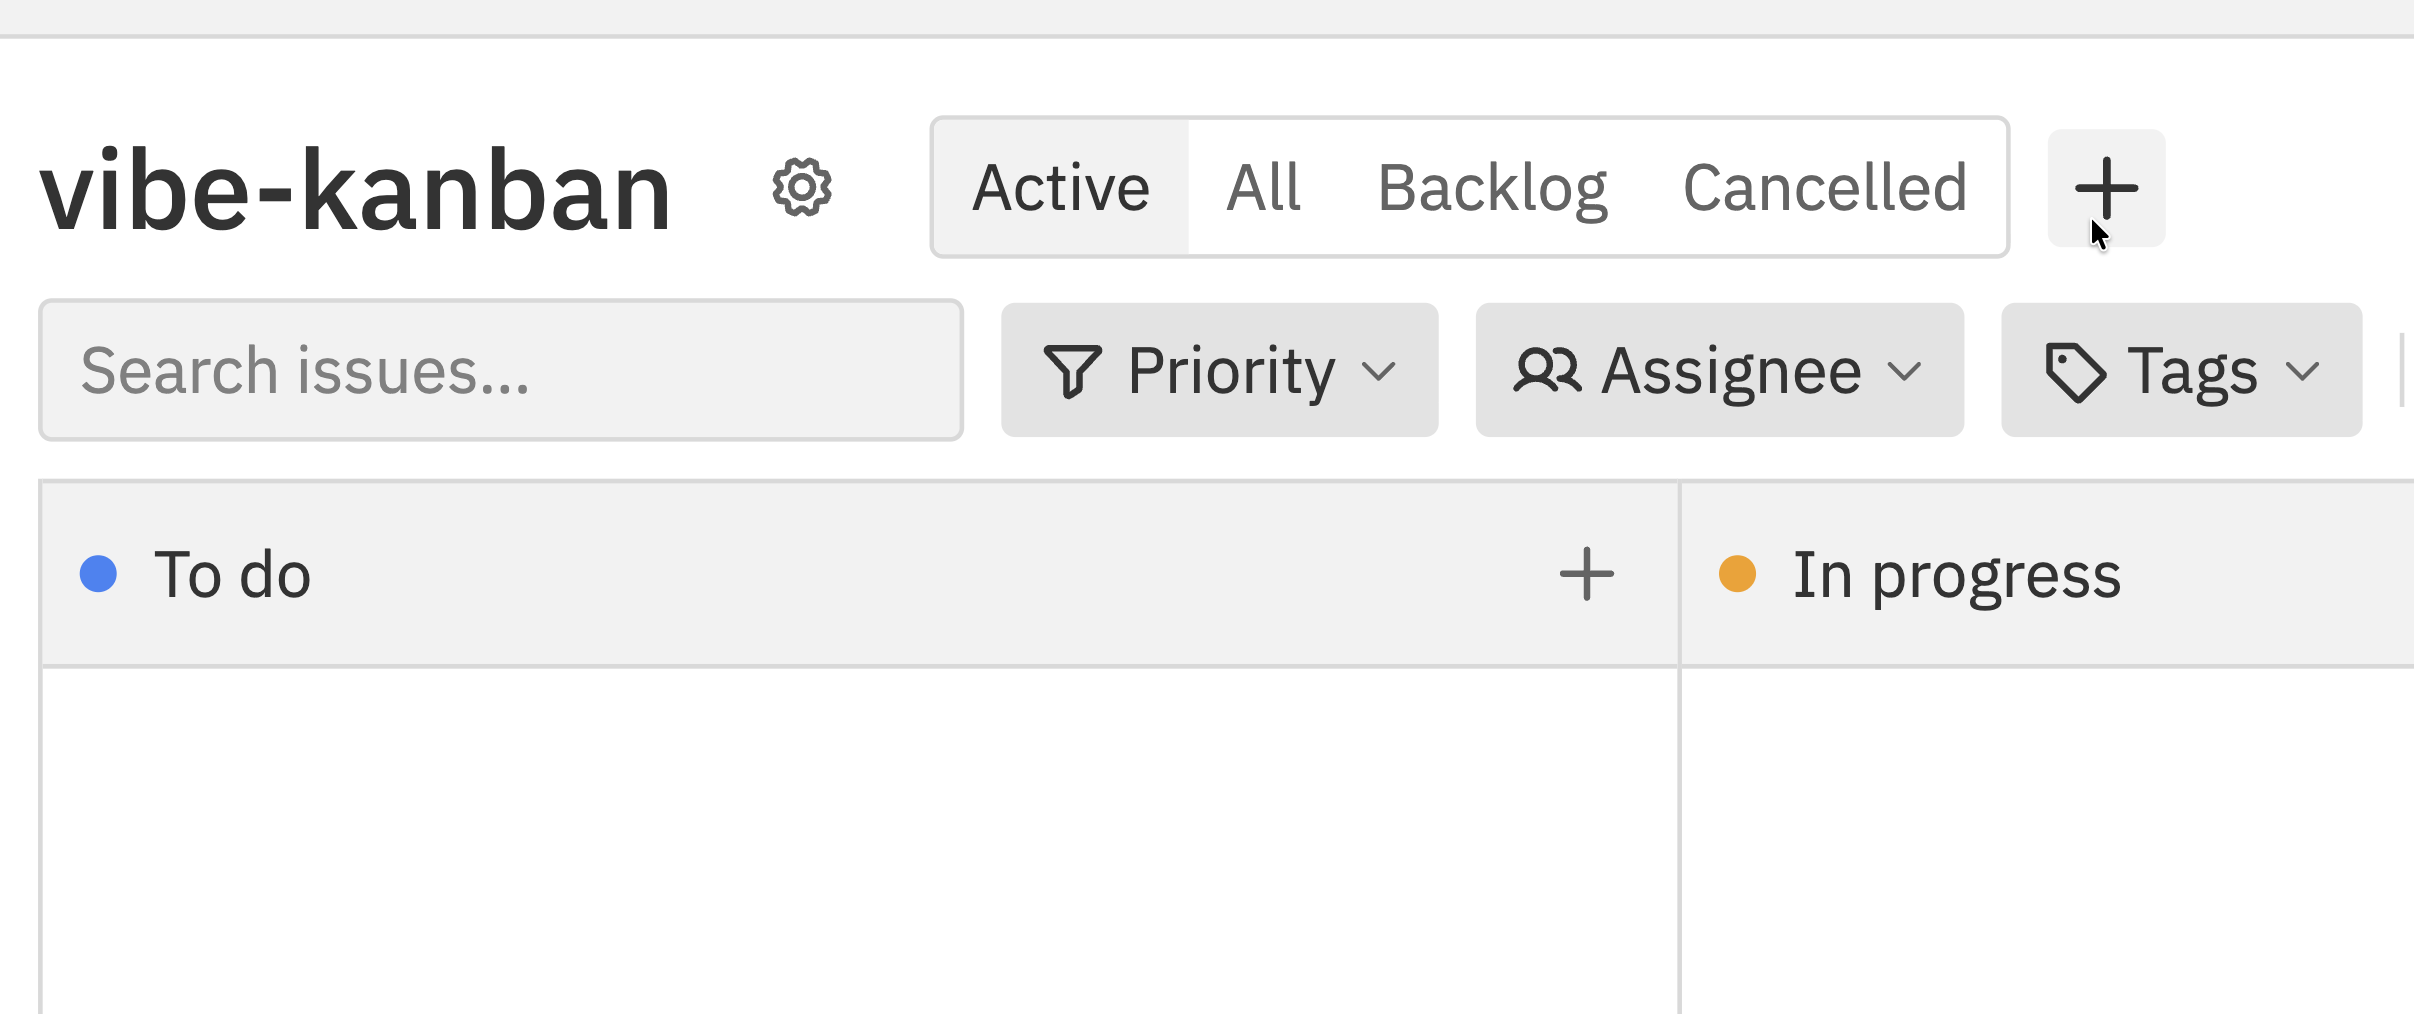 Click the **+** button in the header next to the status tabs.
Type a clear, descriptive title. The title field is focused automatically.
Choose which column the issue should start in.
Select a priority level (default is no priority):
| Priority | When to Use |
| ---------- | ---------------------------------------------- |
| **Urgent** | Needs immediate attention, blocking other work |
| **High** | Important, should be done soon |
| **Medium** | Normal priority |
| **Low** | Nice to have, can wait |
Click the assignee field and select one or more team members. You can assign multiple people to the same issue.
Select tags to categorise the issue. Tags help with filtering and organisation.
Write a detailed description using the rich text editor. You can format text, add lists, code blocks, and links.
Click **Create Task** to save the issue. The issue will appear on the board in the selected status column.
### Create with Workspace
If you want to immediately start working on an issue with AI assistance:
Click the **+** button in the header next to the status tabs.
Type a clear, descriptive title. The title field is focused automatically.
Choose which column the issue should start in.
Select a priority level (default is no priority):
| Priority | When to Use |
| ---------- | ---------------------------------------------- |
| **Urgent** | Needs immediate attention, blocking other work |
| **High** | Important, should be done soon |
| **Medium** | Normal priority |
| **Low** | Nice to have, can wait |
Click the assignee field and select one or more team members. You can assign multiple people to the same issue.
Select tags to categorise the issue. Tags help with filtering and organisation.
Write a detailed description using the rich text editor. You can format text, add lists, code blocks, and links.
Click **Create Task** to save the issue. The issue will appear on the board in the selected status column.
### Create with Workspace
If you want to immediately start working on an issue with AI assistance:
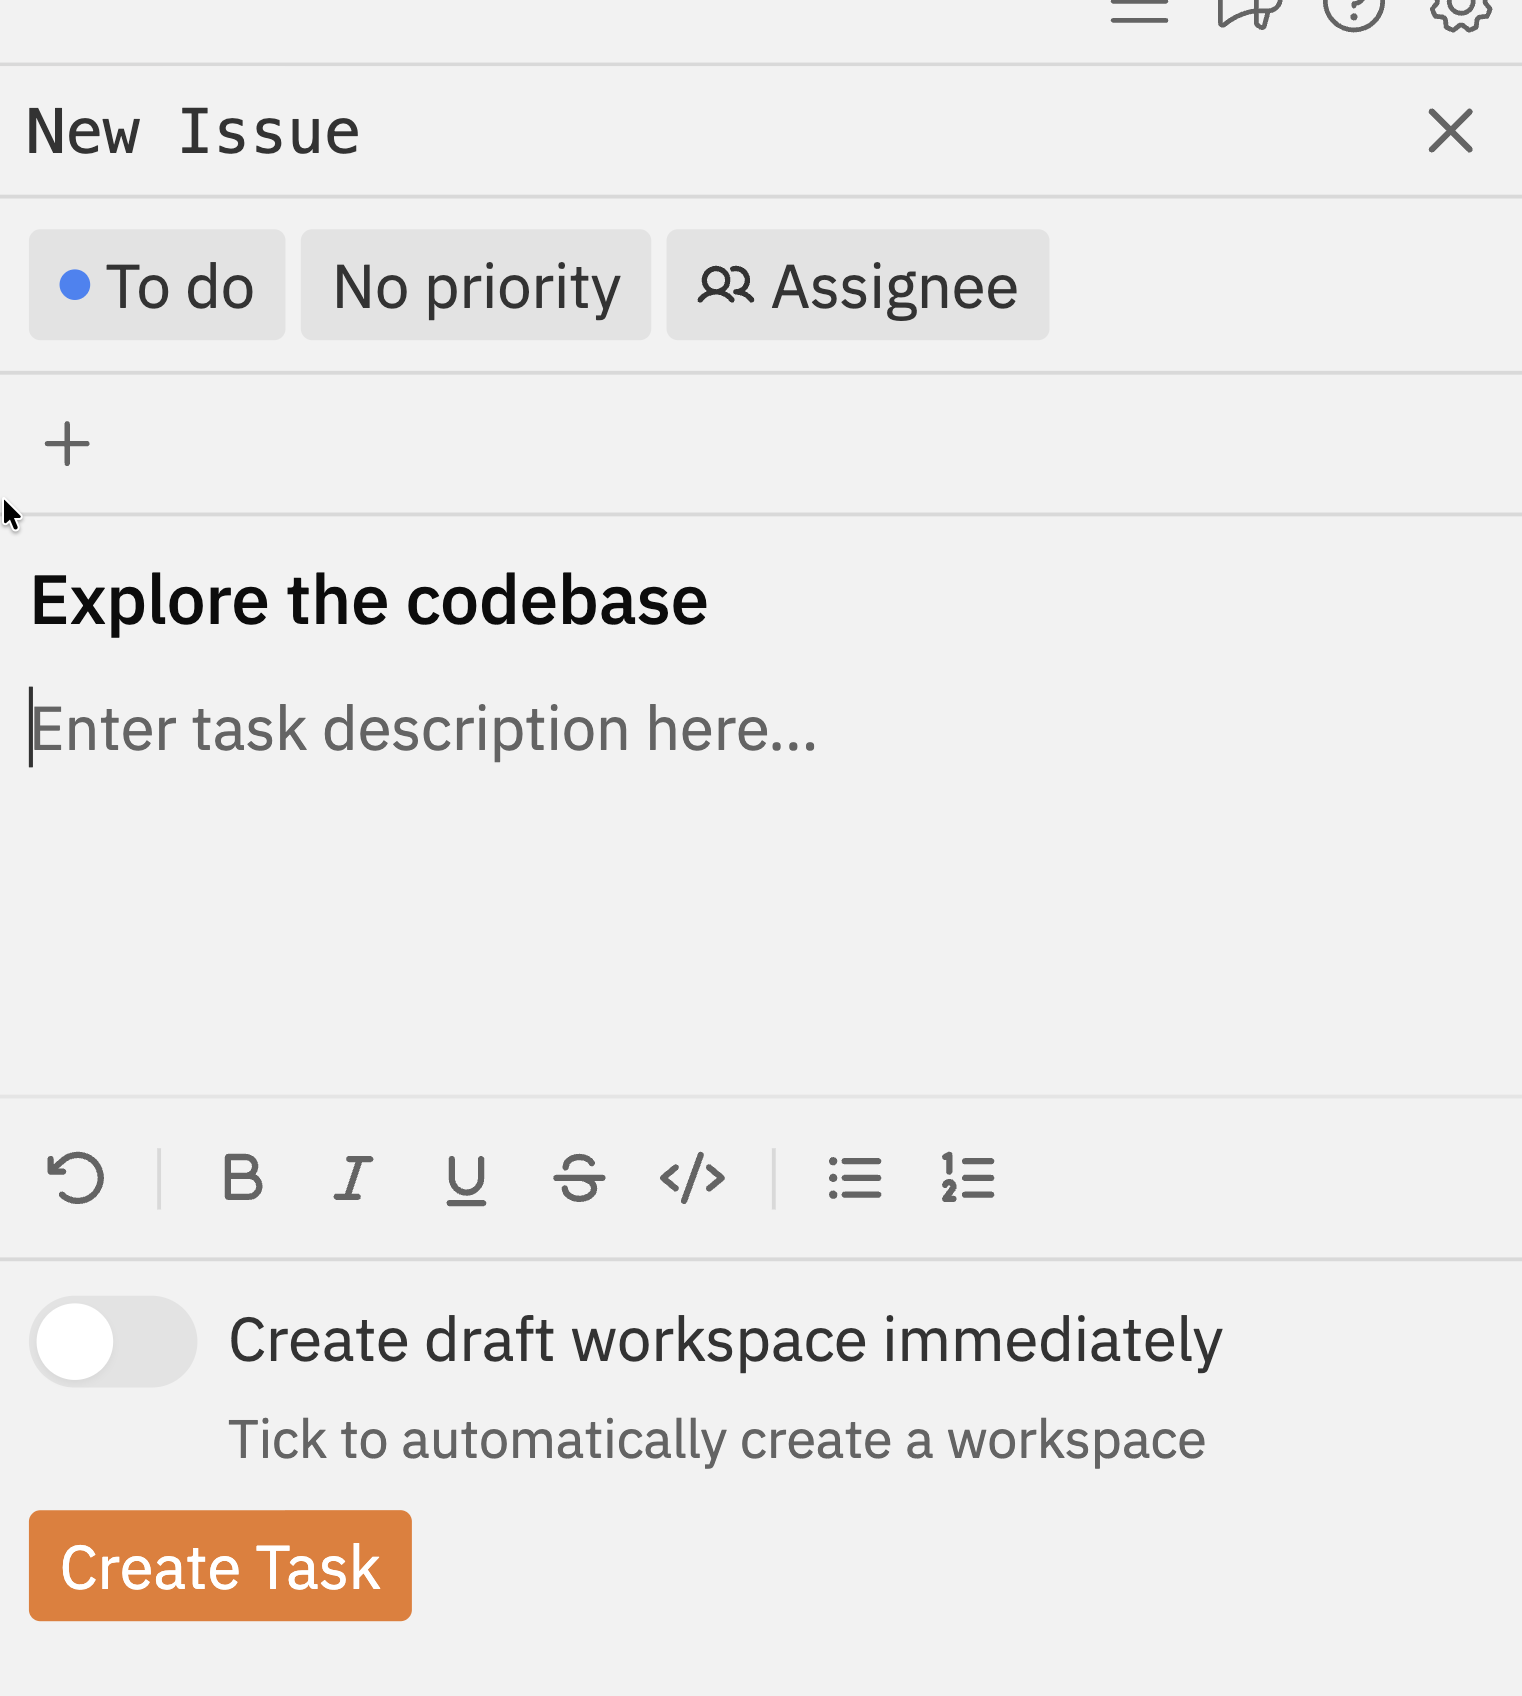 1. When creating an issue, enable **Create draft workspace immediately**
2. The issue is created with a linked [workspace](/workspaces/index)
3. You can start working with coding agents right away
See [Workspaces](/workspaces/index) to learn more about working with coding agents.
## Editing Issues
### Opening an Issue
Click any issue card on the board to open the issue panel. The panel slides in from the right side.
### Auto-Save
Changes to the title and description **save automatically** as you type. You don't need to click a save button - just edit and your changes are saved.
Auto-save has a small delay (about half a second) to avoid saving every keystroke. If you close the panel immediately after typing, wait a moment for the save to complete.
### Editing Properties
Properties like status, priority, assignees, and tags save **immediately** when you change them:
| Property | How to Edit |
| ------------- | ------------------------------------------------------------------------------------- |
| **Status** | Click the status dropdown and select a new status, or drag the card to another column |
| **Priority** | Click the priority dropdown and select a level |
| **Assignees** | Click the assignees field, select/deselect team members |
| **Tags** | Click the tags field, select/deselect tags |
### Editing the Description
The description uses a rich text editor with formatting options:
* **Bold**, *italic*, ~~strikethrough~~
* Bullet lists and numbered lists
* Code blocks for technical content
* Links to external resources
## Issue Sections
The issue panel has collapsible sections for additional information:
### Workspaces Section
Shows development workspaces linked to this issue. [Workspaces](/workspaces/index) are where coding agents do their work.
1. When creating an issue, enable **Create draft workspace immediately**
2. The issue is created with a linked [workspace](/workspaces/index)
3. You can start working with coding agents right away
See [Workspaces](/workspaces/index) to learn more about working with coding agents.
## Editing Issues
### Opening an Issue
Click any issue card on the board to open the issue panel. The panel slides in from the right side.
### Auto-Save
Changes to the title and description **save automatically** as you type. You don't need to click a save button - just edit and your changes are saved.
Auto-save has a small delay (about half a second) to avoid saving every keystroke. If you close the panel immediately after typing, wait a moment for the save to complete.
### Editing Properties
Properties like status, priority, assignees, and tags save **immediately** when you change them:
| Property | How to Edit |
| ------------- | ------------------------------------------------------------------------------------- |
| **Status** | Click the status dropdown and select a new status, or drag the card to another column |
| **Priority** | Click the priority dropdown and select a level |
| **Assignees** | Click the assignees field, select/deselect team members |
| **Tags** | Click the tags field, select/deselect tags |
### Editing the Description
The description uses a rich text editor with formatting options:
* **Bold**, *italic*, ~~strikethrough~~
* Bullet lists and numbered lists
* Code blocks for technical content
* Links to external resources
## Issue Sections
The issue panel has collapsible sections for additional information:
### Workspaces Section
Shows development workspaces linked to this issue. [Workspaces](/workspaces/index) are where coding agents do their work.
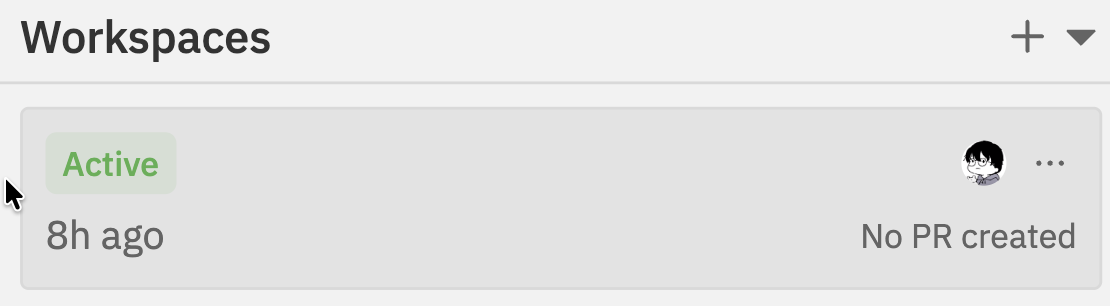 Each linked workspace shows:
* **Status** - Active, idle, or completed
* **Age** - How long ago it was created
* **PR status** - Whether a pull request has been created
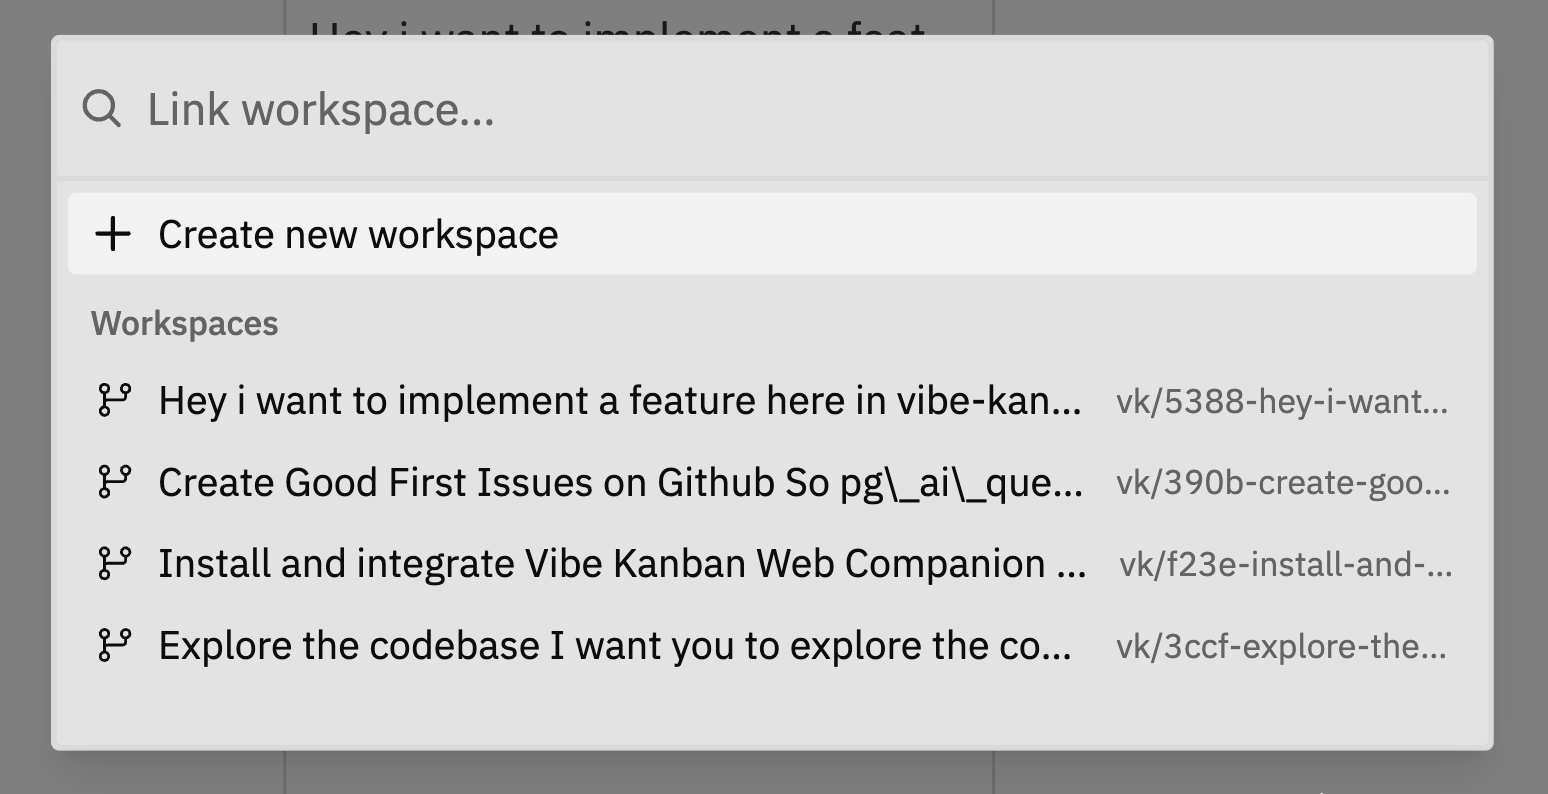
**To link a workspace:**
Click the **+** button in the Workspaces section header to create a new workspace or link an existing one.
Each linked workspace shows:
* **Status** - Active, idle, or completed
* **Age** - How long ago it was created
* **PR status** - Whether a pull request has been created
**To link a workspace:**
Click the **+** button in the Workspaces section header to create a new workspace or link an existing one.
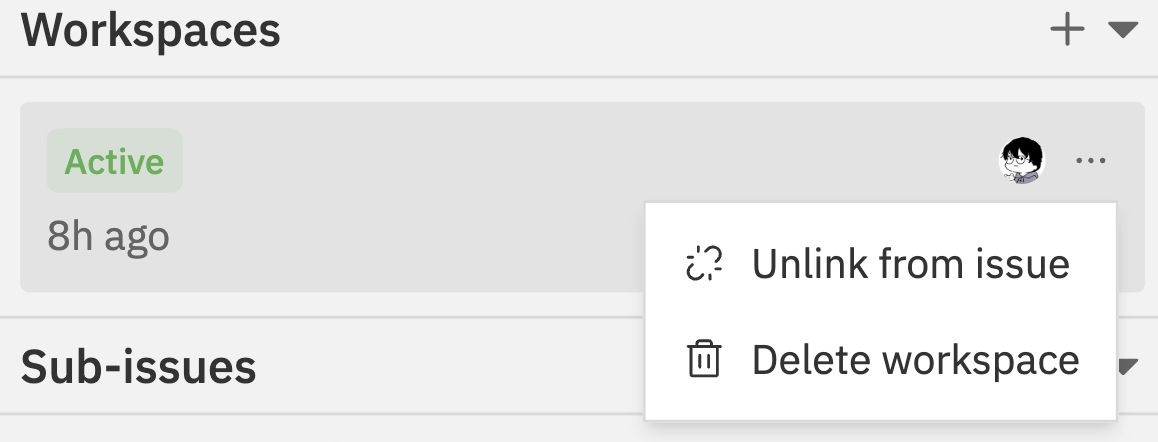
 **To unlink a workspace:**
Click the **⋯** menu on the workspace and select **Unlink from issue**.
**To unlink a workspace:**
Click the **⋯** menu on the workspace and select **Unlink from issue**.
 ### Sub-Issues Section
Issues can have child issues (subtasks) for breaking down work:
### Sub-Issues Section
Issues can have child issues (subtasks) for breaking down work:
 * **Add Sub-Issue** - Create a new child issue
* **Link Existing Issue** - Make an existing issue a subtask
* **View Parent** - If this is a sub-issue, see its parent
### Comments Section
Discussion thread for the issue:
* **Add Comment** - Share updates, ask questions, or provide feedback
* **React** - Add emoji reactions to comments
* **Edit/Delete** - Modify or remove your own comments
## Sub-Issues (Subtasks)
Break large issues into smaller, manageable pieces using sub-issues.
### Creating a Sub-Issue
Click the issue that will be the parent.
Click the **Sub-Issues** section header to expand it.
Click the **+** button in the Sub-Issues section header. A dropdown appears with options to create a new issue or link an existing one.
* **Add Sub-Issue** - Create a new child issue
* **Link Existing Issue** - Make an existing issue a subtask
* **View Parent** - If this is a sub-issue, see its parent
### Comments Section
Discussion thread for the issue:
* **Add Comment** - Share updates, ask questions, or provide feedback
* **React** - Add emoji reactions to comments
* **Edit/Delete** - Modify or remove your own comments
## Sub-Issues (Subtasks)
Break large issues into smaller, manageable pieces using sub-issues.
### Creating a Sub-Issue
Click the issue that will be the parent.
Click the **Sub-Issues** section header to expand it.
Click the **+** button in the Sub-Issues section header. A dropdown appears with options to create a new issue or link an existing one.
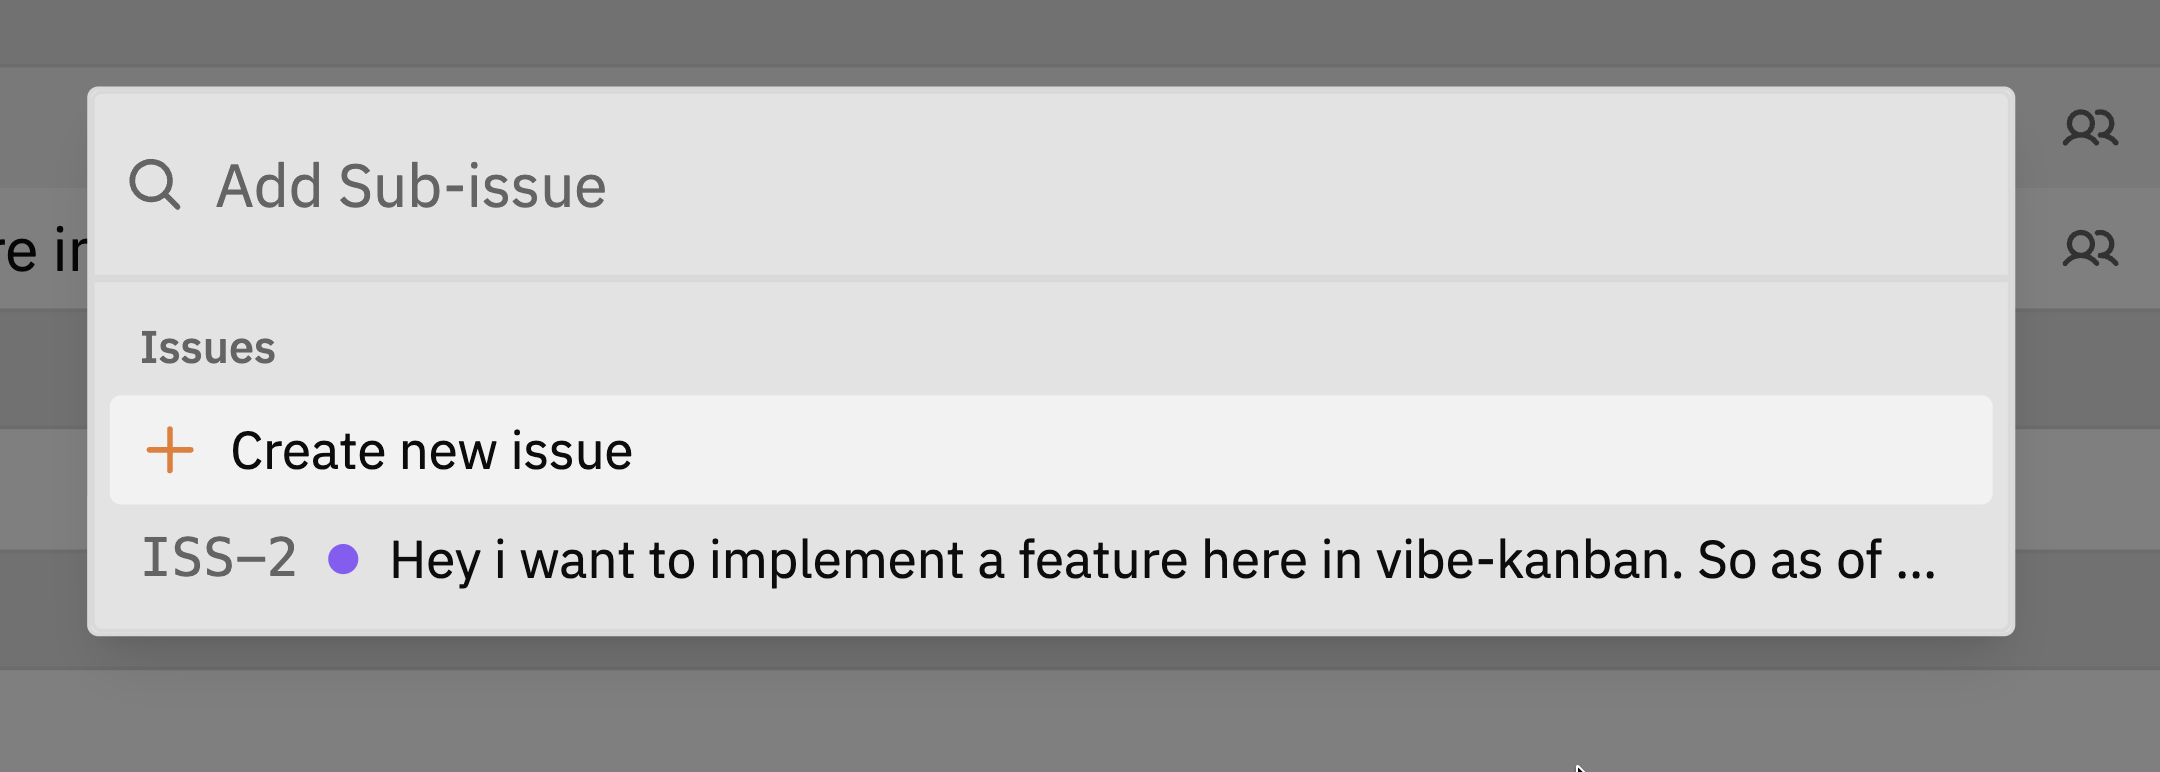 * Click **Create new issue** to create a new sub-issue
* Or select an existing issue from the list to link it as a sub-issue
### Viewing the Parent Issue
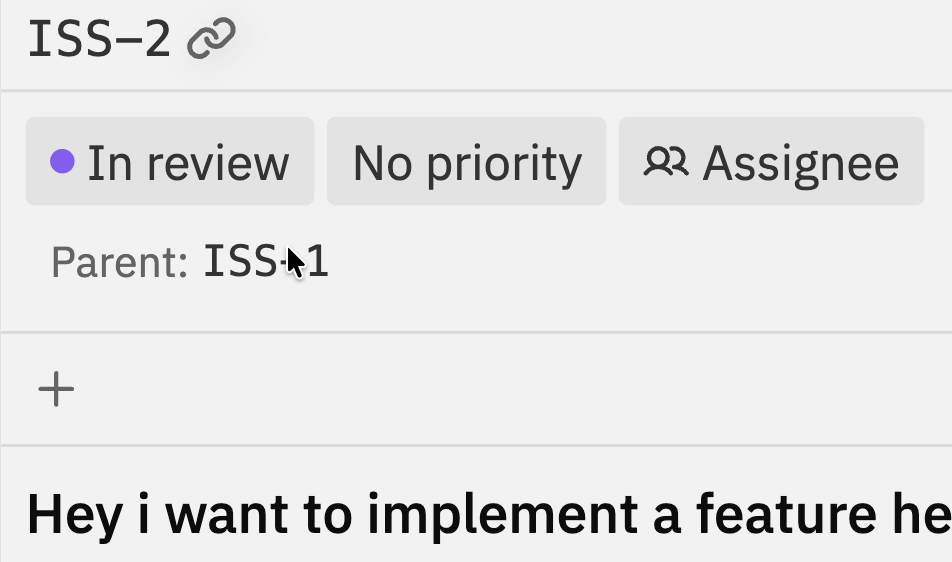
When viewing a sub-issue, you'll see a **Parent** link below the issue properties. Click it to navigate to the parent issue.
* Click **Create new issue** to create a new sub-issue
* Or select an existing issue from the list to link it as a sub-issue
### Viewing the Parent Issue
When viewing a sub-issue, you'll see a **Parent** link below the issue properties. Click it to navigate to the parent issue.
 ### Sub-Issue Behaviour
* Sub-issues appear on the board just like regular issues
* They can have their own status, priority, and assignees
* Completing all sub-issues doesn't automatically complete the parent
* Sub-issues can't have their own sub-issues (only one level deep)
## Issue Actions
Issue Actions provide quick access to common operations on an issue. You can access them in two ways:
### From the Issue Panel
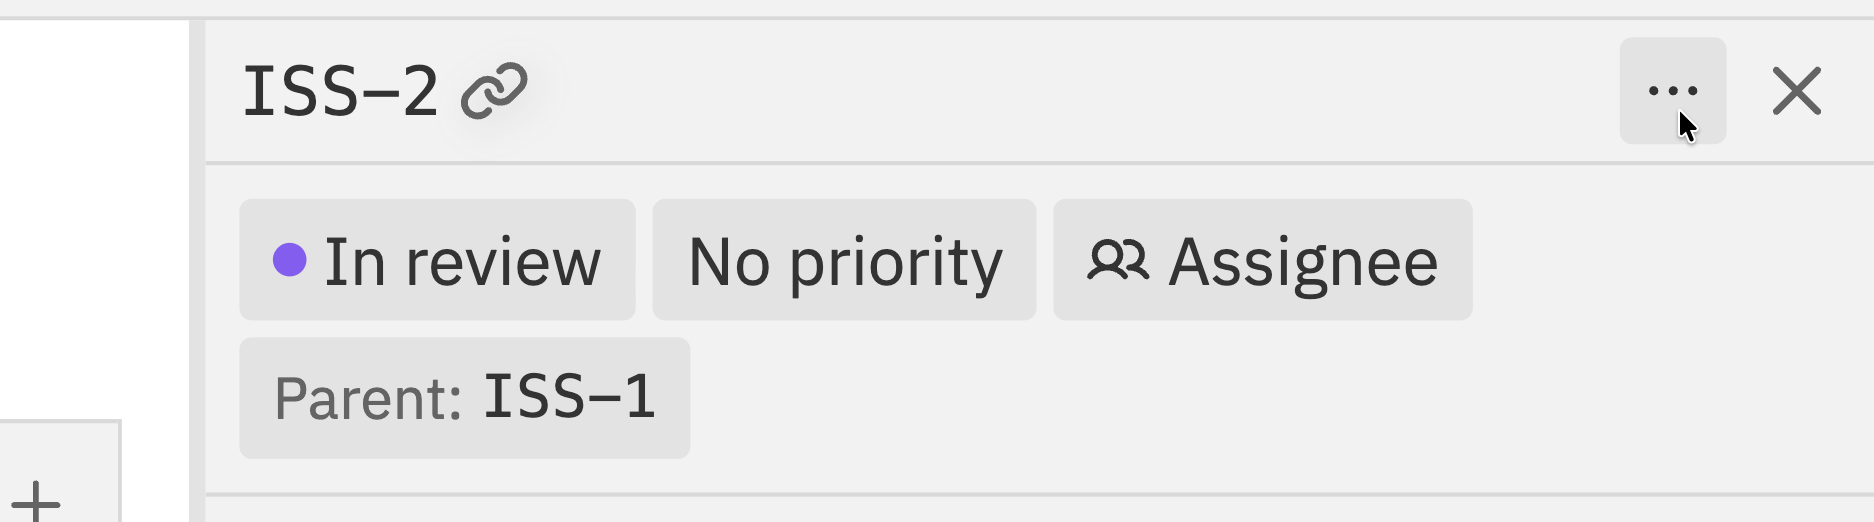
Click the **More** button (three dots) in the top-right corner of the issue panel.
### Sub-Issue Behaviour
* Sub-issues appear on the board just like regular issues
* They can have their own status, priority, and assignees
* Completing all sub-issues doesn't automatically complete the parent
* Sub-issues can't have their own sub-issues (only one level deep)
## Issue Actions
Issue Actions provide quick access to common operations on an issue. You can access them in two ways:
### From the Issue Panel
Click the **More** button (three dots) in the top-right corner of the issue panel.
 ### From the Command Bar
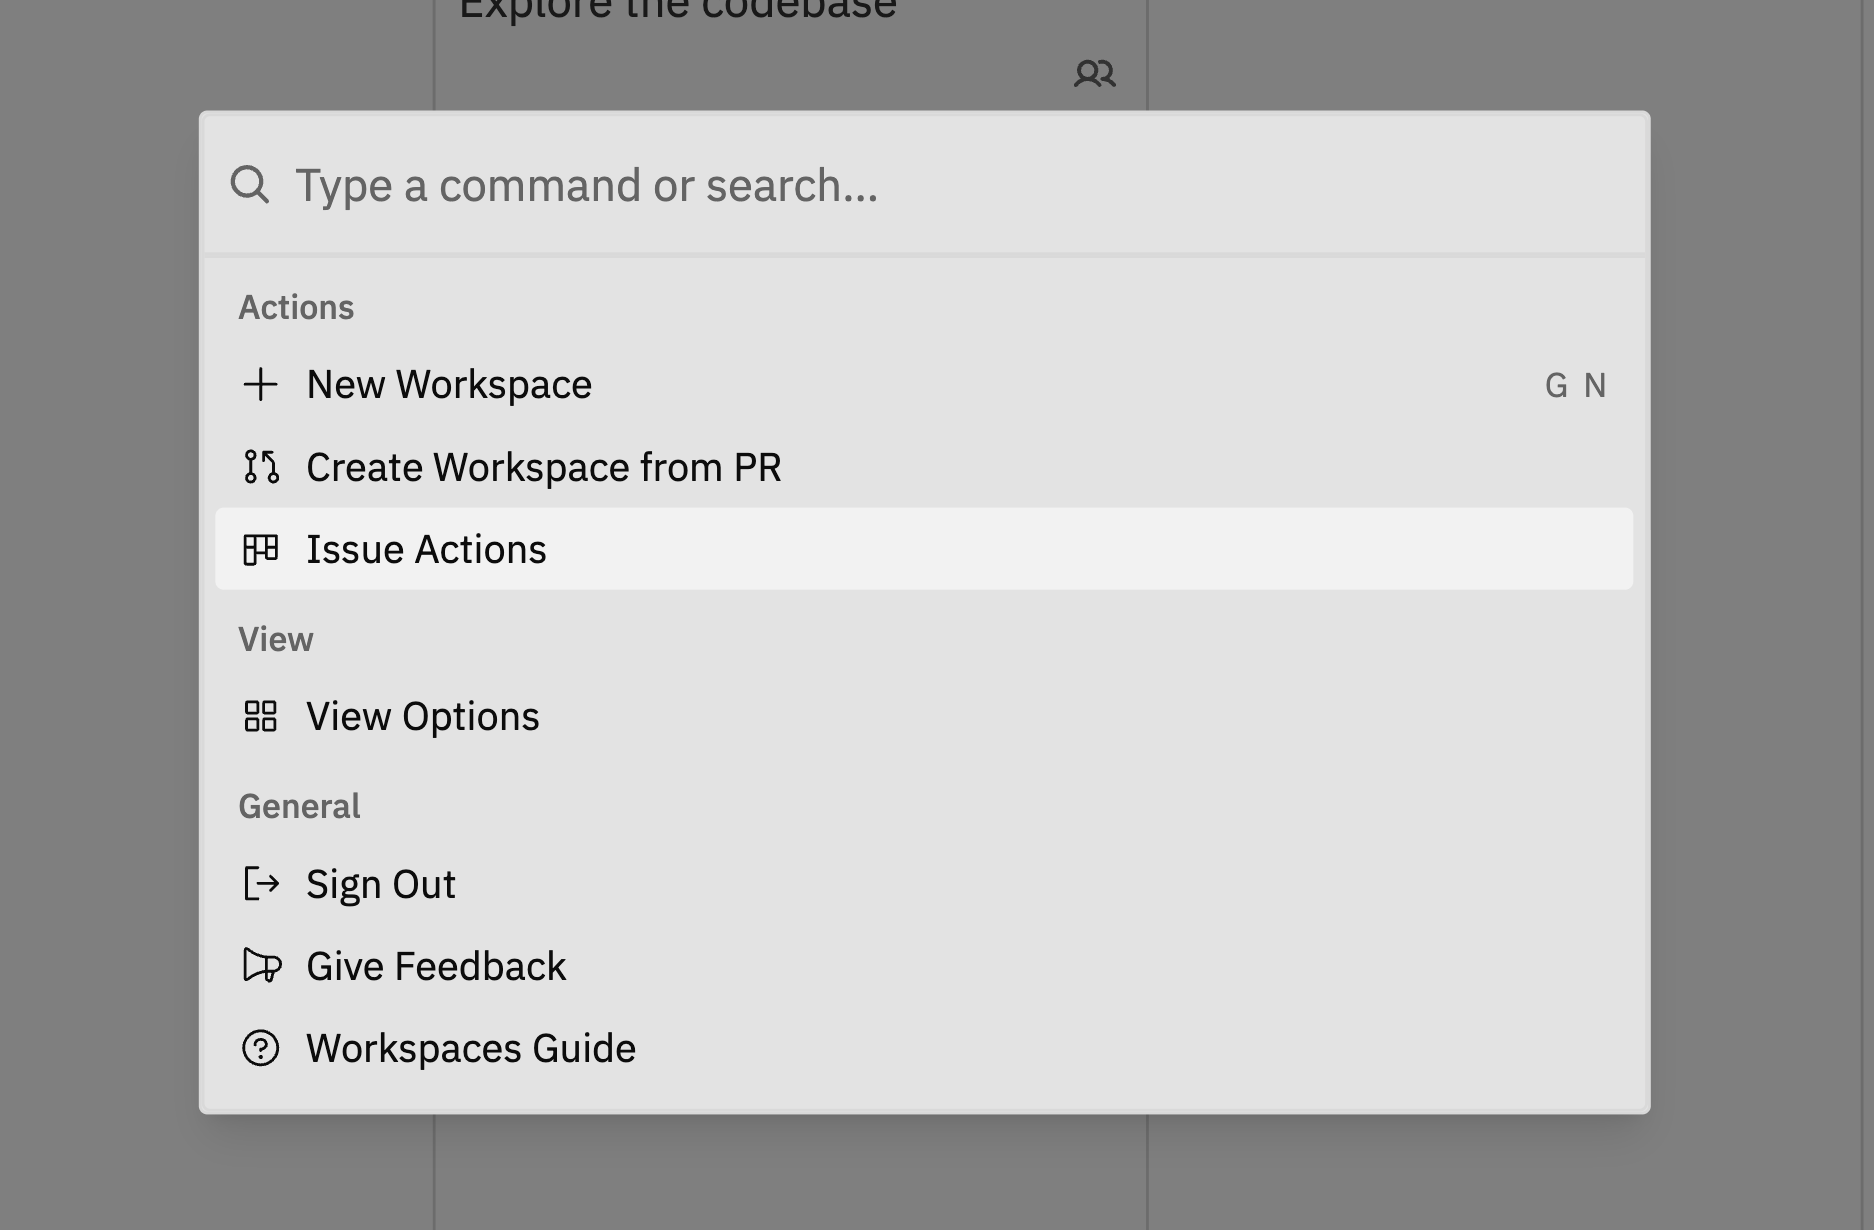
Open the command bar with `Cmd/Ctrl + K`, then select **Issue Actions**.
### From the Command Bar
Open the command bar with `Cmd/Ctrl + K`, then select **Issue Actions**.
 ### Available Actions
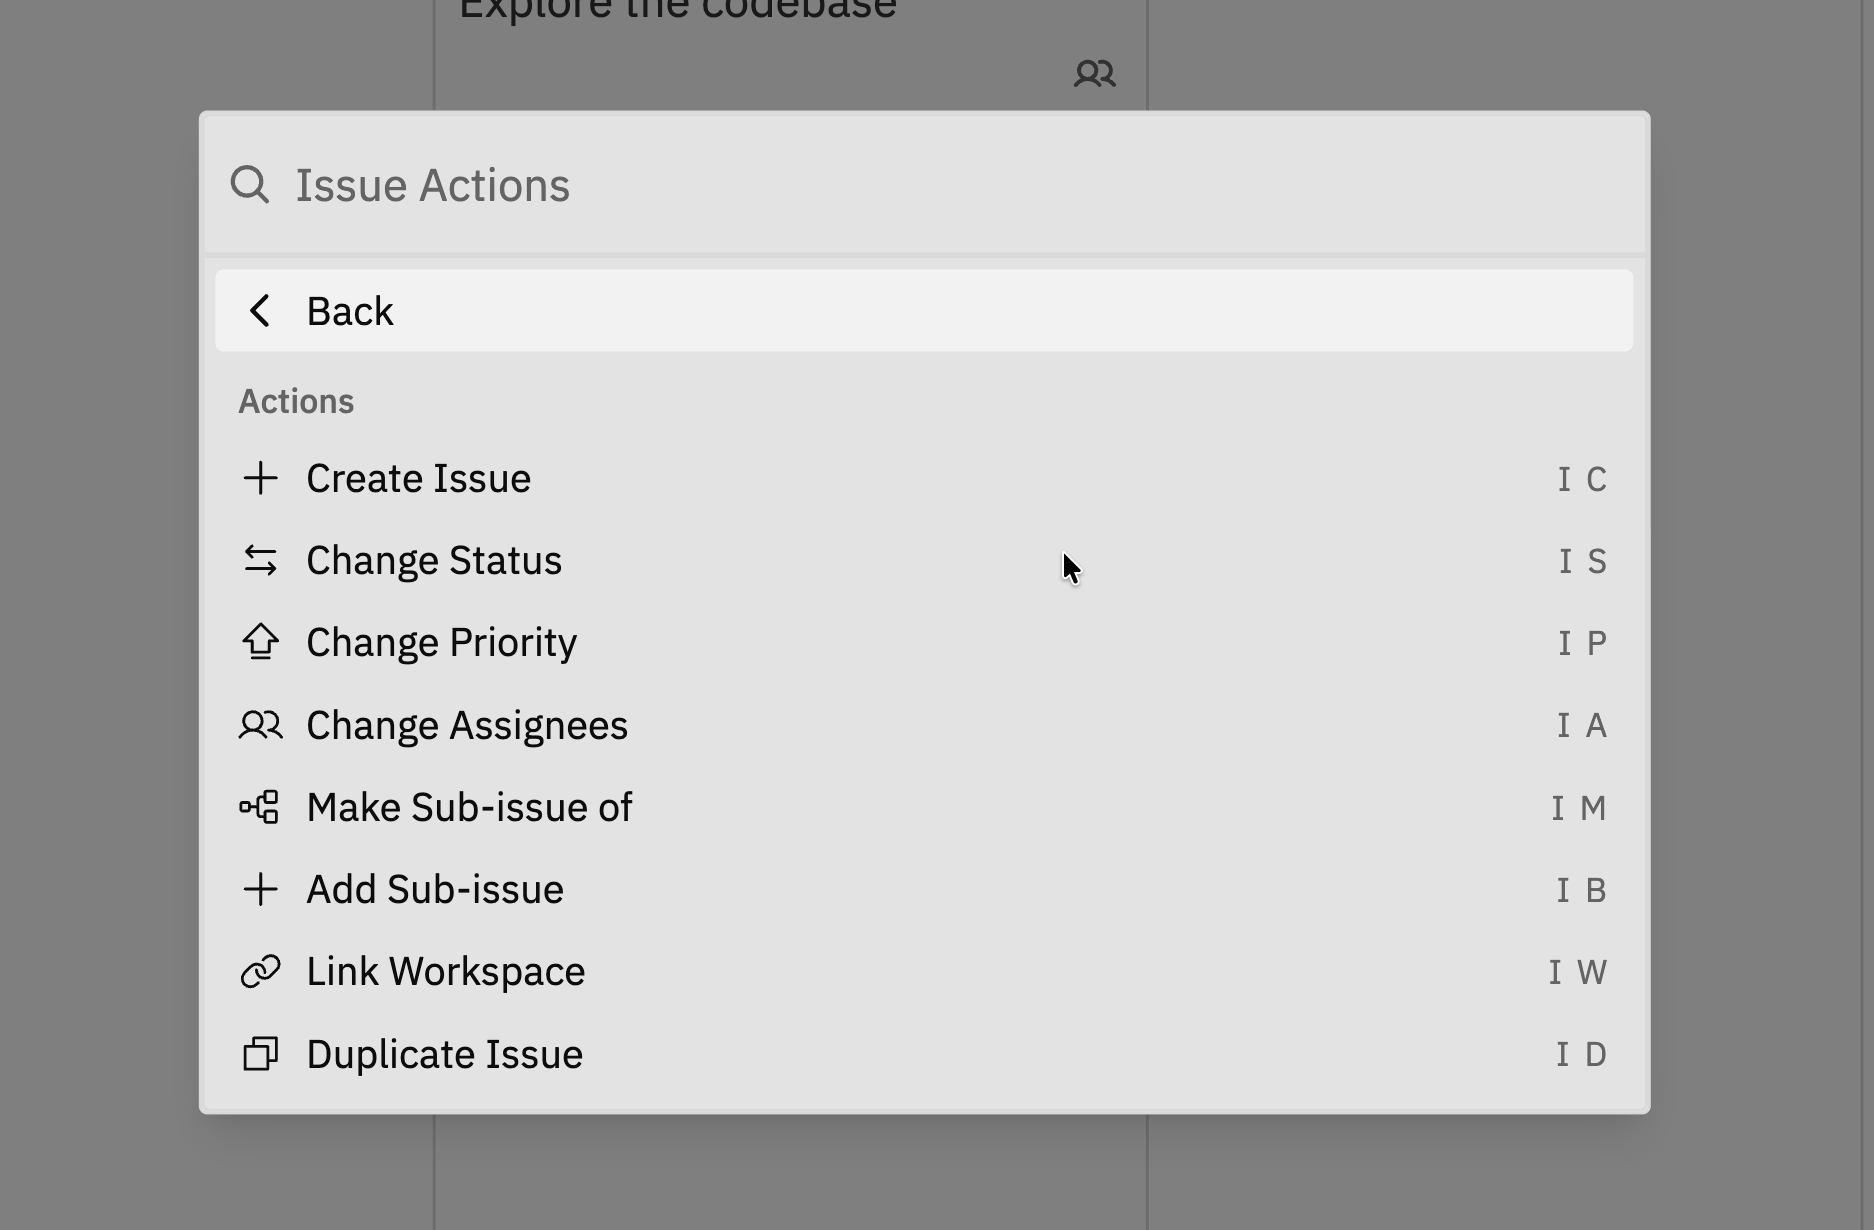 | Action | Shortcut | Description |
| --------------------- | -------- | ---------------------------------- |
| **Create Issue** | `I C` | Create a new issue |
| **Change Status** | `I S` | Move issue to a different status |
| **Change Priority** | `I P` | Set or change priority level |
| **Change Assignees** | `I A` | Add or remove assignees |
| **Make Sub-issue of** | `I M` | Make this issue a child of another |
| **Add Sub-issue** | `I B` | Add a sub-issue to this issue |
| **Link Workspace** | `I W` | Connect a workspace to this issue |
| **Duplicate Issue** | `I D` | Create a copy of this issue |
| **Delete Issue** | - | Permanently delete this issue |
## Copying Issue Links
To share an issue with someone:
1. Open the issue panel
2. Click the **Copy Link** button () in the panel header
3. The issue URL is copied to your clipboard
Share this link with team members - they can click it to go directly to that issue.
## Selecting Multiple Issues
You can select multiple issues to perform bulk operations, similar to how you'd select files in a file manager.
### Selection Methods
| Method | Action |
| ------------------------- | ------------------------------------------------------------------------------ |
| **Checkbox** | Hover over the left edge of a list row to reveal its checkbox, then click |
| **Cmd/Ctrl + Click** | Toggle an individual issue in or out of the selection |
| **Shift + Click** | Select a range of issues between the last selected issue and the clicked issue |
| **X** | Toggle the currently open issue in or out of the selection |
| **Shift + J / Shift + ↓** | Extend the selection downward by one issue |
| **Shift + K / Shift + ↑** | Extend the selection upward by one issue |
| **Cmd/Ctrl + A** | Select all visible issues |
| **Escape** | Clear the selection |
Selection works in both the [kanban board](/cloud/kanban-board) and [list view](/cloud/list-view). In list view, checkboxes appear on hover for each row. In the kanban board, use modifier keys or keyboard shortcuts to select cards.
### Bulk Action Bar
When two or more issues are selected, a floating action bar appears at the bottom of the screen. From this bar you can:
| Action | Description |
| ------------ | -------------------------------------------------- |
| **Status** | Change the status of all selected issues at once |
| **Priority** | Set the same priority across all selected issues |
| **Assignee** | Assign or change assignees for all selected issues |
| **Delete** | Permanently delete all selected issues |
Click the **X** button on the action bar or press **Escape** to clear the selection.
Bulk delete is permanent and cannot be undone. All selected issues, their comments, and their history will be removed.
Use filters to narrow down your view before selecting issues. For example, filter by a specific status, then press **Cmd/Ctrl + A** to select all matching issues for a bulk status change.
## Deleting Issues
To delete a single issue:
1. Open the issue panel
2. Click the **More** button (three dots) to open Issue Actions
3. Select **Delete Issue**
4. Confirm the deletion
To delete multiple issues, select them and click **Delete** in the bulk action bar.
Deleting an issue is permanent. The issue, its comments, and its history are removed. Sub-issues are not deleted - they become standalone issues.
## Issue Simple IDs
Every issue has a **Simple ID** - a short, unique identifier like `TASK-123`. This makes it easy to reference issues in conversations, commits, and documentation.
The Simple ID is shown:
* On issue cards on the board
* In the issue panel header
* In the URL when viewing an issue
Use Simple IDs in commit messages (e.g., "Fix login bug TASK-123") to create a clear connection between code and issues.
## Best Practices
Issue titles should describe what needs to be done, not the problem. "Add password reset flow" is better than "Users can't reset password".
Reserve "Urgent" for genuine emergencies. If everything is urgent, nothing is.
Assign issues to people who will actually work on them. Unassigned issues are fine for backlog items.
As requirements change or you learn more, update the description. It's the source of truth for what needs to be done.
## Related Documentation
* [Kanban Board](/cloud/kanban-board) - Moving and organising issues on the board
* [Filtering & Sorting](/cloud/filtering) - Finding issues quickly
* [Customising Your Board](/cloud/customisation) - Configuring statuses and tags
* [Workspaces](/workspaces/index) - Working with coding agents
| Action | Shortcut | Description |
| --------------------- | -------- | ---------------------------------- |
| **Create Issue** | `I C` | Create a new issue |
| **Change Status** | `I S` | Move issue to a different status |
| **Change Priority** | `I P` | Set or change priority level |
| **Change Assignees** | `I A` | Add or remove assignees |
| **Make Sub-issue of** | `I M` | Make this issue a child of another |
| **Add Sub-issue** | `I B` | Add a sub-issue to this issue |
| **Link Workspace** | `I W` | Connect a workspace to this issue |
| **Duplicate Issue** | `I D` | Create a copy of this issue |
| **Delete Issue** | - | Permanently delete this issue |
## Copying Issue Links
To share an issue with someone:
1. Open the issue panel
2. Click the **Copy Link** button () in the panel header
3. The issue URL is copied to your clipboard
Share this link with team members - they can click it to go directly to that issue.
## Selecting Multiple Issues
You can select multiple issues to perform bulk operations, similar to how you'd select files in a file manager.
### Selection Methods
| Method | Action |
| ------------------------- | ------------------------------------------------------------------------------ |
| **Checkbox** | Hover over the left edge of a list row to reveal its checkbox, then click |
| **Cmd/Ctrl + Click** | Toggle an individual issue in or out of the selection |
| **Shift + Click** | Select a range of issues between the last selected issue and the clicked issue |
| **X** | Toggle the currently open issue in or out of the selection |
| **Shift + J / Shift + ↓** | Extend the selection downward by one issue |
| **Shift + K / Shift + ↑** | Extend the selection upward by one issue |
| **Cmd/Ctrl + A** | Select all visible issues |
| **Escape** | Clear the selection |
Selection works in both the [kanban board](/cloud/kanban-board) and [list view](/cloud/list-view). In list view, checkboxes appear on hover for each row. In the kanban board, use modifier keys or keyboard shortcuts to select cards.
### Bulk Action Bar
When two or more issues are selected, a floating action bar appears at the bottom of the screen. From this bar you can:
| Action | Description |
| ------------ | -------------------------------------------------- |
| **Status** | Change the status of all selected issues at once |
| **Priority** | Set the same priority across all selected issues |
| **Assignee** | Assign or change assignees for all selected issues |
| **Delete** | Permanently delete all selected issues |
Click the **X** button on the action bar or press **Escape** to clear the selection.
Bulk delete is permanent and cannot be undone. All selected issues, their comments, and their history will be removed.
Use filters to narrow down your view before selecting issues. For example, filter by a specific status, then press **Cmd/Ctrl + A** to select all matching issues for a bulk status change.
## Deleting Issues
To delete a single issue:
1. Open the issue panel
2. Click the **More** button (three dots) to open Issue Actions
3. Select **Delete Issue**
4. Confirm the deletion
To delete multiple issues, select them and click **Delete** in the bulk action bar.
Deleting an issue is permanent. The issue, its comments, and its history are removed. Sub-issues are not deleted - they become standalone issues.
## Issue Simple IDs
Every issue has a **Simple ID** - a short, unique identifier like `TASK-123`. This makes it easy to reference issues in conversations, commits, and documentation.
The Simple ID is shown:
* On issue cards on the board
* In the issue panel header
* In the URL when viewing an issue
Use Simple IDs in commit messages (e.g., "Fix login bug TASK-123") to create a clear connection between code and issues.
## Best Practices
Issue titles should describe what needs to be done, not the problem. "Add password reset flow" is better than "Users can't reset password".
Reserve "Urgent" for genuine emergencies. If everything is urgent, nothing is.
Assign issues to people who will actually work on them. Unassigned issues are fine for backlog items.
As requirements change or you learn more, update the description. It's the source of truth for what needs to be done.
## Related Documentation
* [Kanban Board](/cloud/kanban-board) - Moving and organising issues on the board
* [Filtering & Sorting](/cloud/filtering) - Finding issues quickly
* [Customising Your Board](/cloud/customisation) - Configuring statuses and tags
* [Workspaces](/workspaces/index) - Working with coding agents